 |
|
Adding code to Freeway's output
Using dialog boxes to add code to a page
Extending the code generated for specific items
Displaying custom text in the status line for links
Referencing external URL content when the page is viewed
Using a URL box to reference external content
|
Freeway is designed to help users who don't want to get bogged down by the complexities of HTML code avoid this as much as possible - but there are some things that as yet can't be done in Freeway without "getting your hands dirty" and inserting extra HTML or other code into the Freeway output. This chapter is about the ways you can add to the HTML code that is output by Freeway. Some examples of when you might want to do this are when you want to:
To put it another way, if you have something in mind that isn't supported directly by the existing functionality of Freeway, there's a fair chance that it can be achieved (with a little know-how) by adding to the HTML code that is output by Freeway. Of course, to be able to do this you must know the HTML or Javascript code that needs to be added to achieve your aim. You also need to have a rough idea of the structure of an HTML document in order to help you know where the extra code needs to go. A final consideration is that you may also need to spend a fair amount of extra time on the project, as setting up special effects (and troubleshooting them if there are any hitches) can take significantly longer than most other work you do on a Web site. If you need more help with any of these issues, we recommend you visit the Support area of the SoftPress Web site where you will find the information you need. You'll also find examples of some of the common effects seen on the Web today, as well as step by step instructions on how to achieve them. And of course, you are welcome to contact Technical Support to ask questions at any stage by sending email to support@softpress.com. Adding code to Freeway's outputIMPORTANT - Because of the way Freeway works, (ie, because it generates new HTML pages from scratch whenever a change is made in the Freeway document), it is not advisable to edit the HTML files that are created by Freeway after they have been published. The danger here is that if you alter the page within Freeway after you have edited its HTML file, and rebuild the site, your external changes will be lost. Instead of editing the HTML that Freeway generates, it's often a much better idea to make Freeway insert the necessary custom code each time the pages are created. To do this, you add code within the Freeway document which will then be added to the HTML output next time you use the Publish or Preview command within that document. You can use one of several methods to add code to the Freeway document depending on what you want to do:
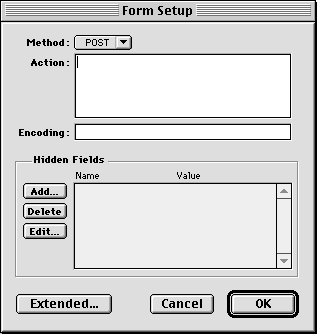
Using dialog boxes to add code to a pageWhen you want to add code that is relevant to the page as a whole, you can use one of three dialog boxes on the Page menu - these are Form Setup, Meta Tags and Markup. Form SetupThe Form Setup dialog allows you add the commands which are required to control what happens when Form information is completed by a visitor viewing the page. You also need to add code to the individual form control items using the Inspector palette, and in some cases you may need to use the Extended command on the Item menu (for more information on the Extended command see below). For more information on Forms and how to use them, see the relevant chapter in this Guide.
Meta TagsMeta Tags are used for various purposes by Web designers. Some important uses are these:
For more information on Meta Tags and how to use them, see the relevant chapter in
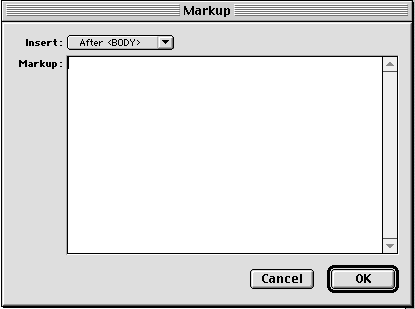
this Guide. MarkupThe Markup dialog provides a simple but powerful means of adding any other custom HTML code or script which needs to be added for a page. Simply choose the section of the HTML document into which you wish the code to be inserted from the popup menu, and paste or type the code into the text field below. Freeway allows you to store separate pieces of code for each of the different sections of the HTML file created for the page, so for example you can add code into the HEAD section as well as at the end of the BODY section for the same page. Examples of when this is useful include defining functions for Javascript, defining a page as a FRAMESET rather than an ordinary page, and automatically centering the page in the browser window. For more information on integrating Javascript or Frames and making the most of them, see the support area on the Web site; http://www.softpress.com/support
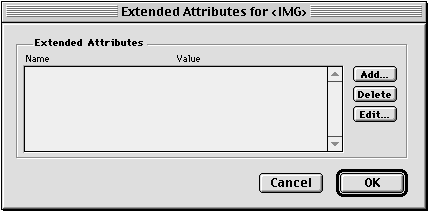
Extending the code generated for specific itemsWhen you need to add code that is to be added to the HTML used to represent a specific item, you can use the Extended command. You'll see this command appear in several places in Freeway - on the Item menu, in the Hyperlink dialog, and on the Page menu. This method is used to 'extend' the HTML code that Freeway outputs for a particular item on the page by instructing Freeway to insert extra code inside the HTML tag that Freeway generates for that object. When you choose the Extended command, a dialog box appears in which you define one or more 'name/value' pairs for the object. You create a new name/value pair by clicking Add in the Extended dialog. The tag that is going to be extended by the name/value pair you define depends on the type of object selected at the time, and which Extended command you're using, and is shown at the top of the dialog box.
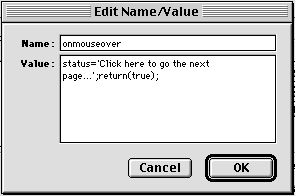
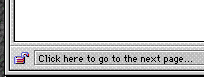
Name/value pairs are defined such that the text you type into the two fields is added either side of an equals sign. In addition, the content of the value field will be enclosed in double quotes on output. IMPORTANT - because Freeway will use double quotes to encapsulate the text you add for the value, you must use only single quotes within the Value field. Displaying custom text in the status line for linksA helpful technique to assist visitors to your site is to use the status line that appears at the foot of the browser window to display information about where a hyperlink will take them. For example, extending a hyperlink on a linked graphic with some Javascript to show a message in the status line at the foot of the browser window could be done by the following:
When you view the page in a Web browser which supports Javascript commands and move the pointer over the linked graphic, the status line at the bottom of the browser window will read "Click here to go to the next page..." instead of showing the destination URL as it normally would.
Referencing external URL content when the page is viewedThere are occasions when you want the Web page you create to include content dynamically, perhaps referencing graphics or HTML code which changes or is updated more frequently than your page. Examples of this might be advertising banners, counters which record how many visitors have viewed your page, or stock market figures which are updated from a database live on the Web. In cases like these, you wouldn't want to have to import the new content, publish the site and upload the new files whenever the content changes. Instead, you want to leave room in your page for some external content which is only inserted when the page is viewed by a visitor. There are two ways of doing this, depending on whether the content you want to reference externally is a graphic, or a text file containing a snippet of HTML code. Using a URL box to reference external contentIn order to reference any external content on the Web within a Freeway page, you must;
When the page is exported, Freeway simply leaves a space in the page the size of the box you drew and either references or includes the contents of the specified URL. When the page is viewed on the Web, as long as the external content is available at the specified URL, the page will appear correctly with the external content in place.
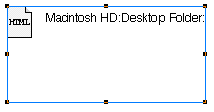
IMPORTANT - If you specify external content in a URL box using the 'HTML content' option, this can only be previewed when the pages are served by Web server software - you will NOT see the included HTML when previewing locally in your web browser. This is because the comment used to reference external HTML is not an instruction to a Web browser, but rather an instruction to Web server software. Importing HTML content onto a pageIf you have HTML content which you wish to add to a page (perhaps recreating functionality which is not yet included in Freeway) you may import an HTML text file from disk into a box in Freeway. The imported HTML can't be displayed or edited within Freeway, but will be visible when the page is previewed in a Web browser. To import HTML content
You can use complete HTML pages if you need to, although some Web browsers may react unpredictably. We recommend that if you are using this feature, the imported HTML file should be edited so as to contain only the parts you actually need. Bear in mind that some commands in the imported HTML file may conflict with commands used by Freeway, so as to cause unpredictable results in the browser. An example of this is imported HTML which contains HTML form commands - form elements created in Freeway may fail to reproduce correctly when the page is viewed in the browser when the combination page is viewed. Creating new Font Sets to apply to HTML textWhen formatting HTML text, Freeway offers an extremely limited subset of fonts; Courier, Helvetica, Symbol and Times. These are the only typefaces which have equivalents common to the majority of machines connected to the Internet, and can be used with a reasonable confidence that they will appear correctly when viewed by all visitors to your Web site. However, there are many occasions when a need arises to specify other fonts beside these basic four. You can specify other fonts and apply them to HTML text by defining new Font Sets. When specifying fonts it is a good idea to offer alternatives for use if the original font is not present. New Font Sets are created using the Font Sets panel in the Preferences dialog, and then appear in the font menu while working with HTML text. See the accompanying chapter HTML Character Attributes for more information on how to define and apply Font Sets. |
|||

Back to the top |
|||